Frame by frame animation
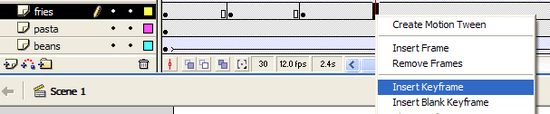
| Click on frame 1 of the fries layer. The cup of chips should be selected on the stage. Now create a Keyframe along the timeline in the fries layer every 10th frame. |
|
 |
|
Now select frame 10 in the fries layer and use the mouse to drag the image up the screen a little bit. Another way to move objects in one direction is to tap the arrow keys when an object is selected. This nudges the object in the direction of the key. Click on frame 30 in the fries layer and tap the down arrow key a few times to drop the image down the stage a bit. Carry on, nudging the image alternately up and down on every other keyframe. Hopefully the image will appear to jump up and down as the movie plays. Click on frame 1 and press enter to see if it works. This is a very simple introduction to frame-by-frame animation. You can move an object (or change its shape) in each successive keyframe and it will animate as the movie plays. The more keyframes, the smoother the animation. In most animations it is good policy to add keyframes as you animate so that each new one starts off based on the changes you made to the last one. Try to get your chips a bit more excited by getting them to jump further (by nudging) or more often (by adding keyframes and then nudging). To make this rather jumpy animation smoother, add a motion tween between each keyframe and then watch the effect. |
|
