Adding content to a layer
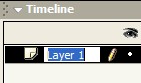
First to organise things a bit. Double-click on the label for the layer called Layer 1. You can then edit it and change it to something more meaningful such as title. |
 |
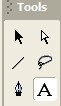
| Now select the text tool by clicking on its icon in the toolbar. |
 |
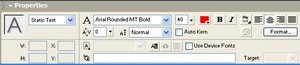
| Use the Properties pane at the bottom of the screen to set the fill colour to red and the text size to 40. |
 |
Now click once onto the stage and a text box will appear. The circle in the top corner indicates that it will automatically expand as you enter text. |
 |
Now type into the box to add text to the stage in the layer you have called title. Don't worry if the text starts to fall off the stage, any object that you place on the stage can be moved around to any position you like. |
|
Click on the arrow tool in the toolbar and the text object will be surrounded by a blue box. You can then drag it to wherever you want it. Put it somewhere near the bottom of the stage. |
|
The next page takes you through animating the text so that it changes size and moves up to the top of the stage. |
|
