LMS - Cloze (stand alone)
The LMS version of the drag and drop template is identical to the original in the way that it works and the options you can set to control it. Therefore, this part of the tutorial does not include how to adapt it. You might want to go to the cloze section to revise how it works.
This template includes an additional piece of code that is called when the activity is complete to send the score to the LMS. This score is then returned to the teacher.
As in the other sections of this tutorial, all the code is Flash MX. So, if you are using the huge number of versions that follow - best of luck!
- Create a work folder for your project.
- Download the template file from here by right-clicking on the link and saving it in the work folder.
- Load it up into Flash.
- Select frame 1 in the scripts layer on the timeline.
- Press F9 to display the Actions window.
- Check that you are viewing it in Expert mode - the View options button is top right of the actions window.
At the top of the Actions / code window is the first additional bit of code.
var lmsInitialized = true;
Now, I have to come clean and admit that setting this variable to true is based on an assumption. Really, we should call a function that has a go at communicating with the LMS and returns true or false depending on its success. Indeed, this is what we would do if we were using Flash's own LMS functions and building our own learning package. However, we are relying on eXe to do all of that automatically for us. Not because we are lazy, but because we are teachers and we have more important stuff to do than all that geeky stuff.
So, setting the variable to true is only telling our movie that we want it to operate inside an LMS. In fact, if we set it to false, the movie would operate as a stand alone drag and drop activity, it won't attempt to talk to the LMS and everything will work in the same way as the standard drag and drop template. This means that we can use the same template for both whiteboard activities (= false) and homework assignments (= true).
Since this is the version of the template that works without any additional text file to supply the er... text, you need to edit the code lower down to supply the words.
Click on frame 2 in the scripts layer and you will see the variables that control colour, font size etc.
var clozeText = "This is the #text for the #first task.";
Your cloze text goes between the quotation marks. Any words you want to be gaps are preceded by #. Finally, a @ forces a new paragraph.
The only other addition to the basic template is a message that is displayed when the last word is correctly placed.
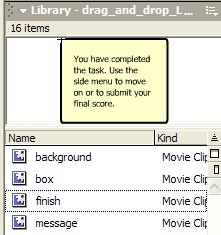
- Press F11 if the library is not already displayed.
- The message that plays once the user has completed the task is called finish.
- This movieclip is appears on the screen if the function is called to pass the score to the LMS.
- Given that your LMS might display the task differently, you might need to edit the message.
- Double click on the icon beside finish to load it in the editing window.
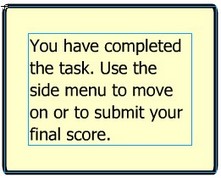
- The text is on the text layer.
- Double click on the text box to edit the text as is appropriate to your LMS.
- If you want to edit the background layer, you may need to unlock it first before resizing or altering its colour scheme.
- Finish editing the movieclip by holding down the Ctrl key while pressing E.