Adding more content
| Click on frame 1 of the title layer. Click on File in the main menu and then select Import... from the sub-menu list. The Import dialog will then appear. Use the controls to navigate to the lesson_1_images folder. |
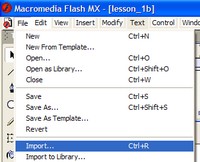 |
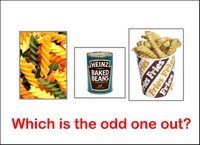
Select the beans image and then click on the Open button. The image of a can of beans manufactured by a famous company will appear on the centre of the stage. Now repeat the process, importing the images of the pasta and then the fries.
|
 |
Each image will be placed in the middle and so tidy up by dragging them so that all three are separated. Now use the mouse pointer to select all three images by dragging a box around them and then releasing the mouse pointer. Each will have a grey box around it to show that it is selected. Make sure that the text at the bottom has not been selected. |
 |
With all three images still selected, click on Modify in the main menu and then select Distribute to Layers from the sub-menu. Each selected object is now placed on its own named layer. This means that you can animate each one independently. You could have created a layer for each image separately and then imported them to their own layers. There are at least 3 ways to carry out most tasks! You now have a nicely organised timeline to your movie, but you have also created a problem. From now on you must keep looking at the timeline every time you intend to change an object to check that you are really changing the intended layer. Unfortunately it is very easy to delete or alter objects on other layers by accident. The best advice is click on an object, check that it has a selection border around it and then look at the timeline to be sure. The next page shows you how to use different animations with the imported images. |
 |
