Starting Off
When you start Flash MX, it will probably look a bit like this.

The first job is to tidy up the screen a bit by getting rid of some of the panels.
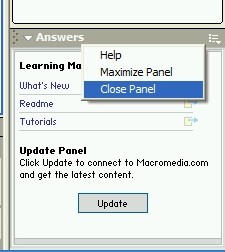
Each panel has a menu icon on the right hand side at the top.
To close a panel, click on its menu icon and select (left-click) Close Panel.
Do this for all the panels on the right hand side until the view looks more like the image below.
Although you will need to get at some of these panels later, you also need to have a clear view of the two most important components of the design environment - the timeline and the stage.

The Timeline
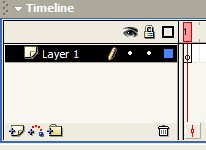
| Have a look at the timeline at the top of the Flash screen. It shows a series of frames that make up the movie. Each object in the movie is normally placed on its own layer e.g. Layer 1. This organises the objects and allows you to do different things with each object. At the moment our movie is only 1 frame. You should be able to see a single rectangle with a circle in it. |
 |
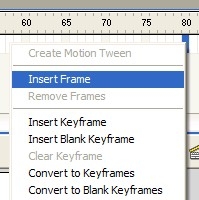
To set the length of our movie and to show you how to alter the timeline, right-click on frame 80 in Layer 1. Select Insert Frame from the menu that appears by left-clicking on it. The frames between 1 and 80 will then be bordered with a rectangle. Each frame lasts 1/12th of a second (although you can change this) so you now have a movie that will last around 7 seconds. However, if you look at the stage, there is nothing in the movie yet. Your next task is to add some content. |
 |
Adding content to a layer
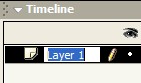
First to organise things a bit. Double-click on the label for the layer called Layer 1. You can then edit it and change it to something more meaningful such as title. |
 |
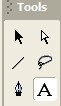
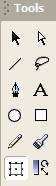
| Now select the text tool by clicking on its icon in the toolbar. |
 |
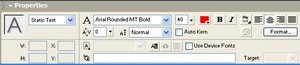
| Use the Properties pane at the bottom of the screen to set the fill colour to red and the text size to 40. |
 |
Now click once onto the stage and a text box will appear. The circle in the top corner indicates that it will automatically expand as you enter text. |
 |
Now type into the box to add text to the stage in the layer you have called title. Don't worry if the text starts to fall off the stage, any object that you place on the stage can be moved around to any position you like. |
|
Click on the arrow tool in the toolbar and the text object will be surrounded by a blue box. You can then drag it to wherever you want it. Put it somewhere near the bottom of the stage. |
|
The next page takes you through animating the text so that it changes size and moves up to the top of the stage. |
|
Animating the text
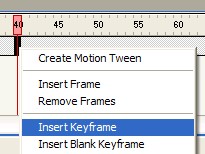
We will start by creating two special frames to act as markers for the text animation. These special frames are called Keyframes. Right-click on frame 40 in the title later and select Insert Keyframe from the menu that appears. |
 |
You will see a distinctive frame with a central circle appear (just like frame 1 which is automatically a Keyframe). When you create a Keyframe in a movie, any objects that were visible on the stage in a previous Keyframe (frame 1 in this case) are copied to the new Keyframe. The idea of a Keyframe is to create a point where something new happens or where something stops happening. Create a Keyframe at the last frame in the title layer - at frame 80. |
|
The idea is going to be to make the text shrink and move between frame 1 and 40 and then grow and move back between frames 40 and 80. Click on Keyframe 40 to select it. Drag the text to the top of the stage. |
 |
If you now click on Keyframes 1, 40 and 80, you should see the text jump from the bottom to the top and then back again. Now to change its size. Click on Keyframe 40 again. Select the free transform tool by clicking on it in the toolbox or by pressing Q. |
 |
The text will now have black handles around it and you will find that you can change its size by dragging on them. Its worth mentioning that the same tool lets you rotate objects, hover the mouse near to a corner and the pointer will change to indictae the rotate function. Make the text smaller by dragging it inwards and then drag it back to the middle of the stage. |
 |
Finally, to make the text animate rather than jump, left-click on a frame between 1 and 40 (but not either of these frames). Look down to the properties pane at the bottom of the screen for the Tween list control. Select Motion from the list. The frames between 1 and 40 now show an arrow, this indicates that the object on the stage will be animated bewteen them. Now click between frames 40 and 80 and add a motion tween for the second half of the movie. |
 |
To test the animation. Click on Keyframe 1 and then press the enter key. Flash previews the movie and you will see the text grow, move and then shrink. The next page shows you how to add more objects to the stage and how to animate them in different ways. |
|
Adding more content
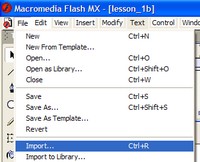
| Click on frame 1 of the title layer. Click on File in the main menu and then select Import... from the sub-menu list. The Import dialog will then appear. Use the controls to navigate to the lesson_1_images folder. |
 |
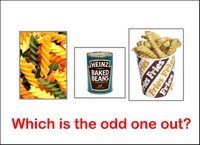
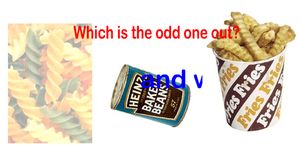
Select the beans image and then click on the Open button. The image of a can of beans manufactured by a famous company will appear on the centre of the stage. Now repeat the process, importing the images of the pasta and then the fries.
|
 |
Each image will be placed in the middle and so tidy up by dragging them so that all three are separated. Now use the mouse pointer to select all three images by dragging a box around them and then releasing the mouse pointer. Each will have a grey box around it to show that it is selected. Make sure that the text at the bottom has not been selected. |
 |
With all three images still selected, click on Modify in the main menu and then select Distribute to Layers from the sub-menu. Each selected object is now placed on its own named layer. This means that you can animate each one independently. You could have created a layer for each image separately and then imported them to their own layers. There are at least 3 ways to carry out most tasks! You now have a nicely organised timeline to your movie, but you have also created a problem. From now on you must keep looking at the timeline every time you intend to change an object to check that you are really changing the intended layer. Unfortunately it is very easy to delete or alter objects on other layers by accident. The best advice is click on an object, check that it has a selection border around it and then look at the timeline to be sure. The next page shows you how to use different animations with the imported images. |
 |
Using tween properties
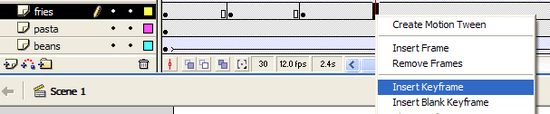
| Click on the beans tin and then look up to the timeline to check that you are working in the beans layer. Notice that you can achieve the same thing by clicking on frame 1 on the beans layer. The beans image will be selected. Now right-click on frame 40 in the beans layer and select Insert Keyframe from the menu. Place a Keyframe on frame 80 of the beans layer. |
|
Click back on frame 40 of the beans layer and then add a motion tween using the list control in the properties pane. You will see the tween arrow between frames 1 and 40. |
|
Since the beans tin is in the same position on frame 1 and frame 40, the tween doesn't do anything yet. Check that you have still clicked on a frame inside the tween and then use the tween properties at the bottom to choose CW from the rotate control. This will rotate the object once clockwise between frame 1 and frame 40. |
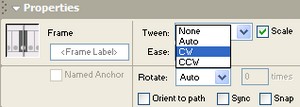 |
Now click on a frame between 40 and 80 in the beans layer and add a motion tween that rotates the tin anti-clockwise once as the movie plays. Remember to look for counter-clockwise or CCW! Move the play head (the red rectangle above the timeline) back to frame 1 and press enter to see the effect. If you want to rotate the shape more quickly, alter the number of times it rotates in the tween properties. |
|
Frame by frame animation
| Click on frame 1 of the fries layer. The cup of chips should be selected on the stage. Now create a Keyframe along the timeline in the fries layer every 10th frame. |
|
 |
|
Now select frame 10 in the fries layer and use the mouse to drag the image up the screen a little bit. Another way to move objects in one direction is to tap the arrow keys when an object is selected. This nudges the object in the direction of the key. Click on frame 30 in the fries layer and tap the down arrow key a few times to drop the image down the stage a bit. Carry on, nudging the image alternately up and down on every other keyframe. Hopefully the image will appear to jump up and down as the movie plays. Click on frame 1 and press enter to see if it works. This is a very simple introduction to frame-by-frame animation. You can move an object (or change its shape) in each successive keyframe and it will animate as the movie plays. The more keyframes, the smoother the animation. In most animations it is good policy to add keyframes as you animate so that each new one starts off based on the changes you made to the last one. Trt to get your chips a bit more excited by getting them to jump further (by nudging) or more often (by adding keyframes and then nudging). To make this rather jumpy animation smoother, add a motion tween between each keyframe and then watch the effect. |
|
Working with a symbol
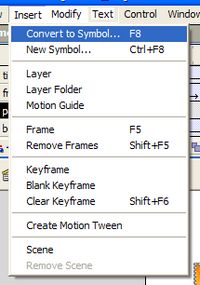
| You are now going to animate the pasta by making it fade in and out as the movie plays. Click on frame 1 on the pasta layer. Check that the image is definitely selected and then click on Insert and then Convert to Symbol... in the sub-menu. Symbols are objects in the movie just like all the other things that you have placed on the stage. Their special feature is that they are placed in the movie's library and you can add copies (called instances) of symbols to the stage without adding to the size of the final movie file. You can also edit a symbol and all the instances of it in the movie are automatically updated. |
 |
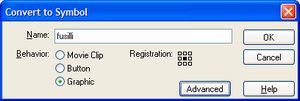
A dialog appears. Use it to give a meaningful name to the symbol (e.g. fusilli!) and select its behaviour. You will learn more about behaviours in lesson 2. For now select Graphic and then click on OK. |
 |
The only change that you will notice is that the pasta has a blue selection box around it instead of the grey one. However, you can now alter the object in some new ways. |
|
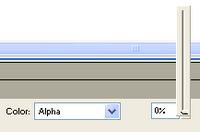
Insert a Keyframe at frame 40 and frame 80 of the pasta layer. Click on frame 1 of the pasta layer and then click on the object on the stage. Use the symbol's properties at the bottom of the screen to chage the color alpha property to 0%. The alpha property sets the object's opacity. In this case, you have made it completely transparent. |
 |
Repeat the procedure for frame 40 in the pasta layer, but set its alpha to 100%. Finally, move to frame 80 and set the symbol's alpha property to 0%. If you watched the movie now, the pasta would stat of invisible, suddenly appear half way through and then just as suddenly disappear. To make it fade in and then out, insert a motion tween between each keyframe. Try the movie and then see if the effect is better if the pasta fades the opposite way as it plays by changing its alpha property on each keyframe. You could have the symbol partly visible at frame 40. Click on Next to add one more animation. |
|
Using path animation
| Click on the beans layer so that it is highlighted. Select Insert and then New Layer. A new layer will appear above beans with its default name e.g. Layer 8. Double-click on the name and change it to question. |
 |
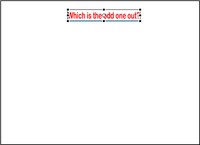
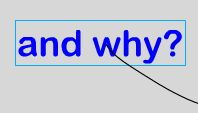
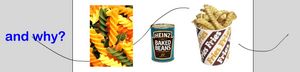
Click on frame 1 of the layer question and then select the text tool. Use the properties pane to make the text fill colour blue and the size 40. With the text tool still selected, click in the grey area to the left of the stage and enter and why? into the text box. Select the arrow tool and click on the text to select it. Drag it so that the words are all off the stage and about half way up. |
 |
Insert a Keyframe at frame 80 on the question layer and then click on that keyframe. Check that you are definitely working in the right layer and frame and then drag the text all the way off the right hand edge of the stage. Add a motion tween between frame 1 and frame 80 so that the words fly across the stage as the movie runs. |
|
The words will appear to fly behind objects in layers above its layer and in front of objects in layers below its layer. You can drag the question layer to a different place in the timeline order to change this effect. PowerPoint is quite good at this sort of thing so you are now going to make the words fly along a given path. |
 |
Click on frame 1 of the question layer. Click on the add motion guide button below the layers. A new layer appears above (and attached to) the question layer. |
 |
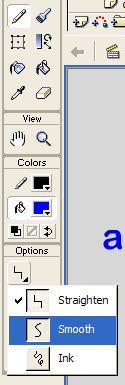
Click on frame 1 of the guide layer for the question layer. Select the pencil tool from the toolbox and in its options pane at the bottom of the toolbox, select smooth. Check that frame 1 of the guide layer is still selected and draw a wavy line on the stage between the place where the question text starts and where it ends up. It doesn't matter if you are a bit out, you can sort it out later.
|
 |
Click on frame 1 in the question layer. Select the arrow tool and use it to drag the text so that it sits on top of the stat of the guide line. Do this at the other end at frame 80. When you try the movie, the text should follow the guide as it flies across. However, if it does not snap to the start of the line, it may just fly straight across. Keep on trying to get the text to latch on, it will after a few attempts. By the way, don't worry about the guide line, it is invisible in the finished movie. |
 |
Publishing your movie
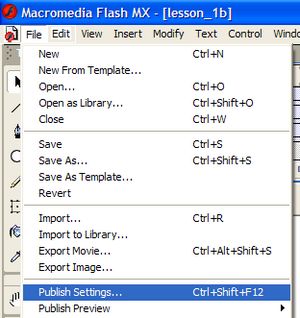
| Now that you have finished your movie, you can publish it to a flash file that can be played using Internet Explorer or added to a PowerPoint slide. You will publish the movie to a shockwave flash file (.swf) and also produce a web page that plays the file automatically. Click on File in the main menu and then Publish Settings...".
|
 |
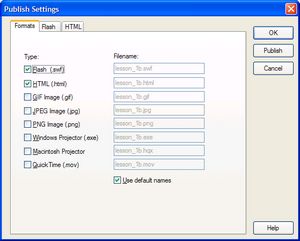
Check that the two default options - flash and html are selected and then click on the Publish button. Flash will compile the flash file, construct a web page and then save both to the folder where you have been saving the working file. You can then click on the OK button to return to the design. The Flash and HTML tabs provide settings for the way that flash should save the files. Have a look at the options but the default settings will work fine for most situations. |
 |
Once you have checked the publish settings in this way you can publish the flash file to the working folder by File and then Publish. The last part of this lesson shows you how you can play your movie. |
|
Playing your movie
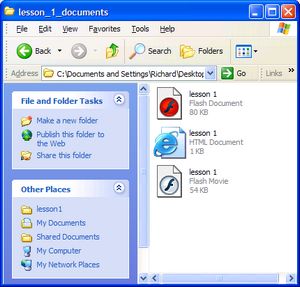
| When you have published the movie, you will probably have three sorts of files in your working folder. The Flash document is the working file containing all the layers and images and tweens. The Flash movie file is the published movie ready to play. The HTML document is a web page set to play the Flash movie file. Note that if you move the HTML document, you must move the Flash movie to the same location. You can rename the HTML file but you should leave the movie file with the same name to ensure that it loads into the web page. |
 |
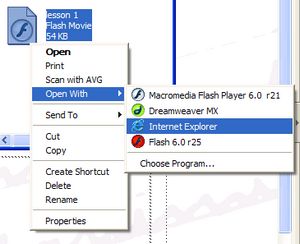
To play your movie, you could... Double-click on the web page. It will load the movie and set it running. Double-click on the movie file. If the flash player is installed, it will load the movie into its own movie and play it. Right-click on the movie file and select Open With and then Internet Explorer. This last method has the advantage over the first in that the movie will automatically resize when you resize the Internet Explorer window. |
 |
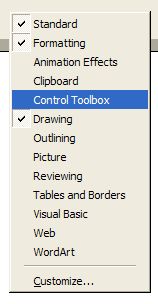
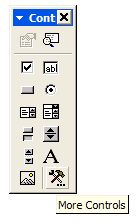
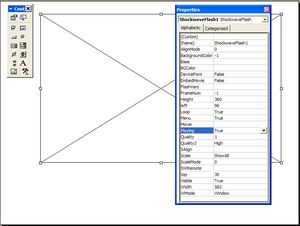
Alternatively, you could insert the movie into a PowerPoint slide. This means that the movie can be a part of a slideshow that brings together a variety of other objects such as images, text, movies and sounds. Start a new PowerPoint presentation. Create a blank slide. Open the Control Toolbox by right-clicking on the grey toolbar area and selecting it from the menu that appears. Click on the More Controls button on the toolbox and then scroll down the menu that appears until you find Shockwave Flash Object. Click on this and the mouse pointer will become a cross hair. Drag a box out on the slide, this is where the movie will be played. Right-click on the box that you drew out and select Properties from the menu that appears. Set the EmbedMovie property to True. This means that once you have run the slideshow once and then saved the movie, it will be a permanent part of the PowerPoint file. Enter the full path to the movie in the Movie property. The best way to do this is to run the movie in Internet Explorer and then highlight and copy the path from Explorer's address bar at the top. It can then be pasted into the property page. Run the slideshow and then save the file. Congratulations, you have created a Flash movie designed to look like a PowerPoint slide, and then put it on a PowerPoint slide! |
|
One last thing...
| You are probably thinking that this has been a lot of effort to produce something that is really rather like PowerPoint. To make matters worse, it isn't always easy to adapt a flash movie to do something different so you might be faced with starting from scratch for the next one! One way to overcome this is to use Flash's facility for swapping images and symbols. This means that you can insert different objects into a movie without having to redesign it from the bottom up. |
|
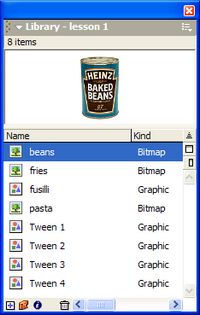
Press the F11 key to bring up the Library window. It shows the main objects in the movie. Right-click on beans in the library and select Properties.... Click on the Import button. Navigate to the folder where you originally found the food images and select the perrier image. When you click on OK, the picture of the Perrier bottle will replace the beans and it will animate in the same way. This trick works best if you have a set of images that are all a similar size, otherwise you may find yourself moving things about on the stage and this can be tricky. |
 |
